Wednesday, March 27, 2013

Edible Boss Kut Dies!


Machine Used: BossKut Gazelle
Software: Funtime Scrapbooking IV
Files Used: Butterfly Egg 0638, Cross by Karen Taglia 0344, Easter Egg with Cross 0640, Lattice Egg BKD 004, Ornamental Egg 0639,
Materials: Card stock, yummy delicious brownies, confectioner sugar

Add a Boss Kut die cut to a mocha brownie and it just doesn't get any better than that!!  Beautiful and delicious all-in-one.  :o)

I started out with getting my brownie batter mixed and in the oven.  Once that was baking, I got out my egg shaped cookie cutter and measure it so that I knew how wide to make the die cuts.


I selected various Boss Kut Die Cuts and cut them out on some scrap paper that I had.  The Gazelle was much faster at getting this part done then the oven did at getting the brownies baked!  :o)


With the brownies done and cooled off, I cut out the egg shapes with the cookie cutter.  I placed my egg shaped brownies on some wax paper and laid the die cuts on top of them.  With a shifter, I put some confectioner sugar on top.

 
Carefully I lifted the die cuts off of the brownies and set them off to the side.  While I did have some of a disagreement with some of the sugar, for the most part I'm really happy with how they turned out!!  Super cute and yummy!!
 

This fun little project took little time and was VERY easy!  Got me to thinking about what you might be able to do with a cake, or a cookie cake.  Maybe use the negative of a cut to create the outline to follow with pipe frosting or gel . . . . hmmmmmm.  ;o)


Thanks for looking!!
*´¨)
¸.•´¸.•*´¨) ¸.•*¨)
(¸.•´ (¸.•` ¤ Jamie*´¨)
BossKut Design Team Member

For more projects and information, please click links below:
BossKut Gazelle Blog
BossKut Company Blog

Saturday, March 23, 2013

NEWS!!

After MUCH considersation and a couple of card classes, I've finally taken the plunge!  I signed up as a Stampin' Up! demonstrator and look forward to what this will teach me in terms of my crafts.

I will continue to work with Boss Kut Gazelle and continue on their design team.  I absolutely LOVE my Gazzy and there really isn't anything that could take me away from her.  :o)

2 different styles of crafting will be coming to a head here and I can't wait to see what the results will be!

Please be sure to check out my Stampin' Up! website for more information.  If you have ANY questions, or would like to host a part LET ME KNOW!!  I can't wait to share with you my love for crafting!

Warmest Regards Always!!
*´¨)
¸.•´¸.•*´¨) ¸.•*¨)
(¸.•´ (¸.•` ¤ Jamie*´¨)

Thursday, March 21, 2013

Hoppy Easter Banner


Machine Used: BossKut Gazelle
Software: Funtime Scrapbooking IV
Files Used: Sitting Bunny Set by Judy Stark BKD 175, Egg Blank 0642
Materials: Card stock, goggle eyes, self adhesive pearls, cotton balls

Hippity hoppity Easter's on it's way!  With Easter just around the corner, we're getting the house decorated accordingly and the only thing missing was a banner.  With some help from the adorable files available at Boss Kut Die Cuts I was able to create a cute banner that my children love!

Using the Egg Blank 0642 I started by adding 2 cut lines at the top.  I added an eighth of an inch longer than the width of my ribbon so that it would be easier to thread the ribbon through.  I then cut out 11 of the eggs in various different papers.

I created the rosette using a piece of yellow card stock that measured 1" x 12".  I scored the strip of paper every 1/2" then flipped the paper upside down and scored every 1/4".  I wanted my rosette to have a egg shape, so I cut out an additional 11 eggs out of pink card stock.  I shaped my rosette to the egg as I glued them together.

I cut out the sentiment "HOPPY EASTER" using the true type font Crazy Harold.  To give the sentiment a little more pop and dimensions, I added an outline and cut that out in a different color.


For my 2 adorable Sitting Bunny Set by Judy Stark BKD 175, I cut each out in a different shade of natural color and inked the edges.  For the cut lines in the bunny, I traced them with a VersaMarker to help the details stand out.  I inked the "inside" of the ear and the cute little nose with pink.

 
For the eyes, I used a black extra fine pen to create eye lashes and to highlight the eyebrow.  To give the eyes additional dimension, I used a piece of white card stock and glued on a goggle eye.  For the inset look of the eye, I took the piece of white card stock with the goggle eye and added it to the back of the bunny using pop dots.


For each of the bunnies, I added a ribbon around their necks and inked the edges.  With my adorable girl bunny, I also added the beautiful flower that comes with the cut file.  I also added some self adhesive pearl embellishments.

Please don't forget to show off your beautiful projects in the Boss Kut Forum and/or the Boss Kut Facebook page!  We'd LOVE to see what you've been creating!!

Thanks for looking!!
*´¨)
¸.•´¸.•*´¨) ¸.•*¨)
(¸.•´ (¸.•` ¤ Jamie*´¨)
BossKut Design Team Member

For more projects and information, please click links below:
BossKut Gazelle Blog
BossKut Company Blog

Monday, March 18, 2013

My First Card Class


I haven't been much into stamping but when the New Year was approaching I was beginning to look at ways to expand my craft and to learn new things.  This brought my attention to the many beautiful creations I've seen others make using Stampin' Up products.
 
I found a wonderful Stampin' Up Demonstrator in my area and have had the opportunity to bombard her with all of my questions.  She's been absolutely WONDERFUL in explaining things and helping me out!  Be sure to check out Lisa's blog at Chocolate Chip Stamping or her Facebook page!
 
Here are the cards that I put together at her March card class.
 
** All cards were designed by her and I simply assembled them. ** 


Maybe not the cleanest stamping but I'm learning!!  :o)  We've all got to start somewhere and I usually jump in both feet and figure it out from there.  Not always the wisest choice but when it comes to my crafting, I don't want to hesitate for fear of missing out on something GREAT!!

Thanks for looking!!
*´¨)
¸.•´¸.•*´¨) ¸.•*¨)
(¸.•´ (¸.•` ¤ Jamie*´¨)

Sunday, March 10, 2013

Bible Easel Card


Machine Used: BossKut Gazelle
Software: Funtime Scrapbooking IV
Files Used: Cross by Karen Taglia 0344, Dove with Scroll by Karen Taglia 0397, Open book available in the Bluebook in Funtime
Materials: Card stock, black glitter heat transfer vinyl, ribbon
Challenges: The Outlawz - Twisted Thursday Bingo Card

I started with using the book cutting file available in the Funtime Blue Book minus the actual pages that I needed for the book.  Don't forget to check out all those cut files that came with your Gazelle!!

The reason for not cutting out the pages yet is because I wanted to give my book a dimensional look and decided that adding more pages would help to achieve that.  Using a fantastic new feature in the Funtime IV software, I was able to increase the size of the pages by percentage!!  For this particular application, it makes it so much easier because the 2 pages of the book that I'm dealing with are different sizes by an odd number.

I re sized my book to 5 X 7 by using the Condense option in the Transformation box.  Fortunately with this particular cut file, by condensing it instead of maintaining the ratio it didn't noticeably distort the image.  I simply chose to do this because it made it easier to assemble a A7 envelope for mailing instead of creating a whole new envelope.  :o)

Now that my book is the size I'd like, I select the image and at the top under Shape, select Break all.  This gives me the ability to select the individual pages.  I chose to make a total of 4 pages (for each side) for my book.  Selecting each of the pages, make an additional 3 copies.

There was no magic in deciding the sizes of each of the layered pages.  I just picked a percentage I thought that work well and went with it.  So, keeping that in mind the top page will remain the size that was created when I condensed my whole book to 5 X 7.  Each page after increases by 2.5%.

 
At this point you will definitely need the transformation box up and have either the Width or Height selected.  Select the second page, in the transformation box I selected Width, then click on the box next to the percentage sign.  Next to the W.: type in 102.5 and hit the Apply button.  You'll notice that once you've selected Apply, the numbers in the boxes will revert back to the measurements instead of the percentage.


The third page I increased by 105% and the final was increased by 107.5%.

I cut out the 2nd, 3rd, and 4th pages and shaded them with some ink.  For the first page I typed out and printed some of the NIV Bible from Mark 16 onto the top pages and cut out the pages around it.  I also added some ink to the edges of the first page.

For the place marker ribbon, I ironed on "He is Risen" using the beautiful black glitter heat transfer vinyl.  Using the video by Terri, Vertical Text, I typed out the sentiment vertically, spaced it to my liking, and then centered it.  Remember when you are working with heat transfer vinyl to cut the vinyl and NOT the backing.  When you go into the cut menu, make sure to "Mirror" your sentiment and "Weed" it.

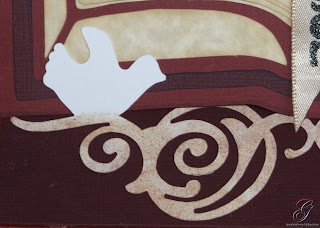
To hold up my book I took 2 of the Dove with Scroll by Karen Taglia 0397 and welded them together.  I glued down the scroll to the base of the card and scored the doves so that they would stand up, supporting the book.


I cut the scrolls out in 110 lb card stock, which by the way my Gazelle cut out beautifully!!  Check out those clean cuts.  Using several different colors of ink pads, I dabbed the scroll to give it a speckled look.


Using the same technique with the inking, I inked the Cross by Karen Taglia 0344 and applied a self adhesive maroon pearl to the center.
 
 
I hope that this project has inspired you to create something beautiful with the Boss Kut Designs and to check out the wonder new features available with Funtime IV!
 
Thanks for looking!!
*´¨)
¸.•´¸.•*´¨) ¸.•*¨)
(¸.•´ (¸.•` ¤ Jamie*´¨)
BossKut Design Team Member

For more projects and information, please click links below:
BossKut Gazelle Blog
BossKut Company Blog

Friday, March 1, 2013

Getting Back At It

My dearest husband and I recently had the wonderful opportunity to visit Okinawa, Japan while the kiddos stayed back in the states with their grandparents.  While I missed my babies so very much it was a very educational experience and one that I'm very glad presented itself.  Thanks to the wonderful technology available I was able to "Face Time" with them and SEE them EVERYDAY!!  I really think that this made is so much easier on them as well as myself.
 
Here are some of my favorite pictures from our trip:
 
Okinawa World Entrance
Copyright © 2013 Jamie Gillahan
 
 
Okinawa World
I LOVED all the flowers that were everywhere.  Absolutely beautiful!!
Copyright © 2013 Jamie Gillahan
 
 
 These was taken on our way to the Ocean Expo Park
Copyright © 2013 Jamie Gillahan

My beautiful nieces
Copyright © 2013 Jamie Gillahan


Okinawa Churaumi Aquarium 
Copyright © 2013 Jamie Gillahan
 
 
 Cape Zanpa Lighthouse
Copyright © 2013 Jamie Gillahan
 
 
 Cape Zanpa Lighthouse
Copyright © 2013 Jamie Gillahan
 
 
 Zakimi Castle Ruins
Copyright © 2013 Jamie Gillahan

 
Peace Prayer Park
Copyright © 2013 Jamie Gillahan


Now that we're back to everyday, I'm trying to find that special place where my creativity will bloom.  Sometimes it's just so hard getting back into the swing of things.  :o)  It seems that I've left my mind and a piece of my heart back in Japan with my brother, his beautiful wife, and their gorgeous daughters.
 
Creating Freebie's
While I've been trying to emerge myself back into my crafting, to help get my brain working back into that area I've been learning how I can save the cut files that I've made into SVG, PDF, and JPG's so that I can share.  I'm hoping to be able to share the cut files as well as the JPG's for those that simply need a template to hand cut.

I'm hoping that in the next day or so I'll have a tab at the top for those freebie's.  Until I am able to create cut files in something other than WPC, it will just be the WPC, PDF, and JPG's that will be available.
 
Thanks for looking!!
*´¨)
¸.•´¸.•*´¨) ¸.•*¨)
(¸.•´ (¸.•` ¤ Jamie*´¨)
Related Posts Plugin for WordPress, Blogger...