Friday, April 19, 2013

Paper Piecing Lily


Machine Used: BossKut Gazelle
Software: Funtime Scrapbooking IV
Files Used: Delicate Flourish 0728, Corner Scroll 0738
Materials: Card stock, ink, markers

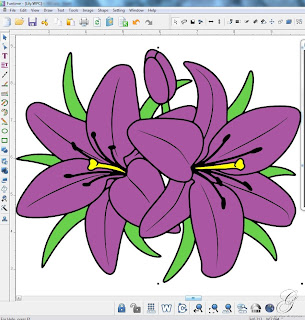
I'm back again with another coloring book page that I imported into Funtime and converted into a paper piecing masterpiece!!  I've visited this particular website a couple of times for the color book pages and I just loved the Lily.  Now if you visit the color by number you'll notice that I didn't exactly follow their "recommendations" and I didn't notice that until after I was done.  Guess that just means I'll have to go back, cut it again, and make another!  :o)
 
 
To make cutting the sections easy, I used the color palate in Funtime to change the line colors.  This allowed me to cut the leaves separate from the pedals.

For more information on how to convert any digital coloring book page to a paper piecing or print and cut file, check out Terri's video!  She provides you with step-by-step instructions and makes it really easy for you.

I duplicated the whole image and changed the pen style to the kiss cut. I made sure to leave my outer most rectangle as the regular cut. Doing this allows me to cut out the rectangle (in this case) and then leave the pattern to follow while I'm piecing my page together! Love this tip, BIG thank to Terri for this one!! Make sure to watch the entirety of the video shared above to see how easy this is to do
 
 
It took me forever to decided how I wanted the pedals to look.  I kept going back and forth between keeping them white and coloring them.  Finally I decided to cut out the pedals in white card stock and inked them up until I got the look I wanted.
 
I also inked the edges of the leaves to give them more dimension than what a plain colored green card stock can.
 
I added the white frame around the paper piecing and although I loved the way the lilies looked, there was something definitely missing!  After searching the Boss Kut Die Cuts, I found the Delicate Flourish 0728 and Corner Scroll 0738 to the perfect finishing touch.
 
 
I inked the edges of both embellishments and used a VersaMarker on the leaves of the Delicate Flourish 0728.

What will you find at Boss Kut Die Cuts that help with your projects?!

Thanks for looking!!
*´¨)
¸.•´¸.•*´¨) ¸.•*¨)
(¸.•´ (¸.•` ¤ Jamie*´¨)
BossKut Design Team Member

For more projects and information, please click links below:
BossKut Gazelle Blog
BossKut Company Blog

Tuesday, April 9, 2013

Stampin' Up! Workshop 4-12-2013 Make 'n' Take


This will be the card that we'll be making at my first workshop.  These make 'n' takes are very simple and require minimal amount of product!


This first card I chose to use the Rich Razzleberry Classic Stampin' Pad for the image and the Old Olive Classic Stampin' Pad for the sentiment.

 
This card I used the Old Olive Stampin' Write Marker and Rich Razzleberry Stampin' Write Marker for the image and again, the Old Olive Classic Stampin' Pad for the sentiment.

What you'll need to create these beautiful cards:

Paper:
Whisper White 8 1/2" x 11" Card Stock
Old Olive 8 1/2" x 11" Card Stock
Rich Razzleberry 8 1/2" x 11" Card Stock
Designer Series Paper Patterns Stack - Brights Collection

Stamps:
Perfectly Penned - Clear Mount Stamp or Wood Mount Stamp
Thoughts & Prayers - Clear Mount Stamp or Wood Mount Stamp

Ink:
Old Olive Classic Stampin' Pad
Old Olive Stampin' Write Marker
Rich Razzleberry Classic Stampin' Pad
Rich Razzleberry Stampin' Write Marker

Don't forget these stampin' essentials to keeping your stamps clean and in top shape:
Stampin' Scrub
Stampin' Mist

Thanks for looking!!
*´¨)
¸.•´¸.•*´¨) ¸.•*¨)
(¸.•´ (¸.•` ¤ Jamie*´¨)
Independent Stampin' Up! Demonstrator

Japan File Folder Keepsake


Machine Used: BossKut Gazelle
Software: Funtime Scrapbooking IV
Files Used: Branch 0988, Fifties Flower 0504, Hibiscus paper piecing 0390,
Materials: File folder, card stock, embellishments, ribbon

In February my dearest hubby and I went to Okinawa, Japan.  We visited with my brother, who is currently stationed there, and his wonderful family.  We had such a great time and came back with so many memories.  We also came back with plenty of souvenirs that now need a good home.

I started out with folding a manila file folder and then inked the edges. 

Then I printed out a world map and used a tea bag to give the map an aged look.  After applying the map to the file folder, I threaded some red embroidery thread to created the dotted line from the United States to Japan.

I attached a piece of ribbon on the back to tie the folder shut.  Then using different designer card stock, I decorated each of the remaining sections.

The flowers were absolutely beautiful in Japan while we were there.  The front of the folder was inspired by the cherry blossoms that were in bloom while we were there.  Using the Fifties Flower 0504 and the branch I decorated the front fold of the file folder. 

Each of the fifties flowers that were cut were a little over a quarter of an inch!  My Gazelle did a beautiful job cutting each of them out.


Using my stylus, I went in circle in the center of the flower to get the flower to fold toward in.  Then I inked each flower to give them a realistic feel.  I just love how my cherry blossom tree turned out that I'm sure to use it again!


Below is a picture of the file folder opened up.  Each pocket is going to hold our receipts, pamphlets, and other goodies from our trip.
 

I chose to use the Hibiscus paper piecing 0390 because it reminded me of one of my favorite pictures that I took.  I cut out 2 of the larger pieces so that I could put in the additional layer.  I inked the center red so that it would like the yellow faded into the red.


Thanks for looking!!
*´¨)
¸.•´¸.•*´¨) ¸.•*¨)
(¸.•´ (¸.•` ¤ Jamie*´¨)
BossKut Design Team Member

For more projects and information, please click links below:
BossKut Gazelle Blog
BossKut Company Blog

Sunday, April 7, 2013

Starr's Photography Watermark


Software: PaintShop Pro X

My cousin asked me if I would help her create a watermark for her photos and of course, my answer was absolutely!  Above is a simple design that we worked on together, via e-mail's.  She chose the fonts and I put them together so that the "S" and the "C" were threaded through each other.

We played with many different fonts and finally settled on the simple ones that would offer her more opportunities than using them in printed form.

Check out her website here or her Facebook page here!!

AND, after that was done I just couldn't stop there!  I offered to make her some vinyl decals for her vehicles.  Where else would I go other than my beautiful Gazzy?!  :o)


Machine Used: BossKut Gazelle
Software: Funtime Scrapbooking IV
Files Used: * see above *
Materials: Oracal 651 vinyl (outdoor vinyl)

The larger decals are 6 inches and the smaller ones are 4 inches.  With the smaller ones, although the "Starr's Photography" and "2013 © Starr Cuevas" cut out beautifully with my Gazelle they were a pain to weed!!  Also, I honestly don't think that they would hold up well on a vehicle.


On a completely different topic, I've expanded to Facebook finally!! Please come check out my page and while you're there, how about a like?! :o)


Thanks for looking!!
*´¨)
¸.•´¸.•*´¨) ¸.•*¨)
(¸.•´ (¸.•` ¤ Jamie*´¨)

Friday, April 5, 2013

FREE SHIPPING!! and a Color Refresh

FREE SHIPPING
this Saturday, April 6th - Monday, April 8th
on EVERYTHING!!

Willing to help out a new independent demonstrator?!?  Check out my Stampin' Up! website and place an order!!

Need help finding something for you?!  LET ME HELP!  Feel free to contact me and I'll help you find that perfect something just for you.
Thanks for looking!!
*´¨)
¸.•´¸.•*´¨) ¸.•*¨)
(¸.•´ (¸.•` ¤ Jamie*´¨)
Independent Stampin' Up Demonstrator
Related Posts Plugin for WordPress, Blogger...