Sunday, December 29, 2013
Stampin' Up! Sale-A-Bration Birthday Card
Stampin' Up! Supplies
Cardstock: Early Espresso 8-1/2X11 #119686, Pacific Point 8-1/2X11 #111350, Whisper White 8-1/2X11 # 100730
Ink: Early Espresso #126974, Pacific Point #126951
Stamp Sets Used: *See Ya Later #133536, *Banner Blast #133554
Punches: *Banner #133519
Embossing: *Decorative Dots #133520
Materials: Early Espresso Baker's Twine #123124
* Sale-A-Bration
Thanks for looking!!
*´¨)
¸.•´¸.•*´¨) ¸.•*¨)
(¸.•´ (¸.•` ¤ Jamie*´¨)
Saturday, December 28, 2013
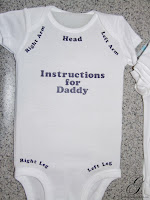
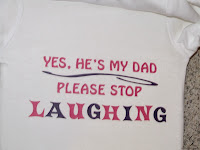
Personalized Baby Onsies
Machine Used: BossKut Gazelle
Software: Funtime Scrapbooking IV
Files Used: Baby Bib with Bows by Scrapcuts by Judy
Materials: Heat transfer vinyl, plain white baby onsies
My cousin approached me and asked if I would be willing to make her some onsies for her great niece that is due in January. Well, obviously I said yes and here is a result of that request. She gave me the sentiments that she wanted and I chose fonts, layouts, and designs.
For some of them I referred to the internet for inspiration.
The first onsie below with the bows I had originally wanted to add the complete file Baby Bib with Bows by Scrapcuts by Judy but was having some issues with getting the bib to fit how I wanted it on the onsie. It's such a beautiful file and I didn't want to distort the image too much and risk loosing the beauty of it. So, I chose to use the bows from the file and add a layered necklace.
Simple designs that add just the right touch to a plain white onsie.
*´¨)
¸.•´¸.•*´¨) ¸.•*¨)
(¸.•´ (¸.•` ¤ Jamie*´¨)
Monday, December 23, 2013
Etched Wine Glasses
Machine Used: BossKut Gazelle
Software: Funtime Scrapbooking IV
Files Used: Simple Fruit Grapes
Materials: Oracal 631 vinyl, Armour Etch
This simple project was created as a gift. I purchased a set of 4 white wine glasses, something I knew that she would like, and added a little personalization to them.
For the first one, I started with the sentiment, "Aged to Perfection." I used the BlackJack true type font and welded the letters together in Funtime. It's one of my favorite fonts to work with lately because I love the look of it when it's welded together.
From the Open Clip Art Library, I downloaded the Simple Fruit Grapes and used the auto vecto feature in Funtime to create the cut file.
For the second one I typed out "Mimi's Sippy Cup" in a true type font called first-grader.
The third and the fourth took a little more time to complete. I stared with the initial of a first name and used the font Easy Street EPS. To create thicker lines, I outlined the letter and deleted the original inital. The benefit to doing this was create the thicker lines and then making it easier to see in the design on the wine glass.
The first names were typed in BlackJack true type font and again I welded the letters together in Funtime.
When I layered the intial and the name together it seemed as though the first name would be lost in the initial when they were etched together. To get the first name to appear on top of the initial I started by creating an outline around the name. Then in Funtime, I took the outline of the name and placed it where I wanted it to appear on the inital.
Make sure to first select the border of the name, right click, and then select To front. This is important to make sure that you do because it is what will make the subtract function work the way we want for this application.
Once you have the name on top of the initial, select both and select the icon on the left of your screen to Subtract all selected objects to the first element.
Now if you go ahead a line up the name on top of the initial you will see a border around the name that goes through the inital.
When you're ready to cut the vinyl, make sure to cut all of it together. That will make it easier and will keep the integrity of the design that you've just worked on!
Thanks for looking!!
*´¨)
¸.•´¸.•*´¨) ¸.•*¨)
(¸.•´ (¸.•` ¤ Jamie*´¨)
Sunday, December 22, 2013
Handmade Ornaments
Materials: Better than salt dough recipe, Christmas ornaments
With one of the snowy days we had recently, the kiddos and I decided we wanted to get creative! Following this
*´¨)
¸.•´¸.•*´¨) ¸.•*¨)
(¸.•´ (¸.•` ¤ Jamie*´¨)
Wednesday, December 18, 2013
Scrapbook and Journal
On my hubby's last deployment to Kuwait he picked up this beautiful camel leather scrapbook and journal filled with blank flower pressed paper for me!! The workmanship on these are STUNNING and the pages waiting to be filled are GORGEOUS! I think that he knows me well to know how much I would LOVE and APPRECIATE such a beautiful gift. To think, I only asked a for a tee shirt. :o)
The above images are of the journal. The first picture is of the front and the second is the back.
A couple flower pressed pages of the journal.
The above images are of the scrapbook.
I'm really looking forward to filling these beautiful pages with the memories that we make together as a family! I've already decided the first couple pages are going to document the gift I received and detail his deployment. It will most likely have to wait until after Christmas and the New Year but I just can't wait!!
While I sincerely appreciate this gift, the best is having my hubby home safe and sound where he belongs!
Thanks for looking!!
*´¨)
¸.•´¸.•*´¨) ¸.•*¨)
(¸.•´ (¸.•` ¤ Jamie*´¨)
Tuesday, December 10, 2013
Christmas Kusudama Ball
Materials: 3" Red Origami paper, green ribbon, white tassel, flower stamen
I've been wanting to make one of these for sometime now . . . probably about the time that I made all those bouquets for my sisters wedding.
I finally sat down long enough to make one and was inspired by the Christmas movies I've been watching as well as a Pinterest pin I saw.
When I first started make kusudama flowers, I followed these instructions for creating the pedals and the flower.
To make a kusudama ball ball, I followed the instructions available here.
As with most things that I'm inspired to create, I enjoy changing things up a bit to "make it my own." After the folding the paper square in half, I took ONE corner and used a corner round punch. This gave the the red the rounded look while letting a little of the back white peek through.
I continued the with the steps of putting the flowers together and then the kusudama ball. I LOVE the way that this turned out. I'm interested in making some more of these, hopefully taking in each of the upcoming holidays into account.
As always, if you have any questions please ask. I love being able to help you achieve your creative potential!! While you could always leave a message here, I check my Facebook Page more often.
Thanks for looking!!
*´¨)
¸.•´¸.•*´¨) ¸.•*¨)
(¸.•´ (¸.•` ¤ Jamie*´¨)
Thursday, October 3, 2013
Join for $25!!
It's Stampin' Up!'s 25th anniversary!!
This offer is only good for two weeks, so take advantage of it right away!During this offer, only the special $25 starter kit will be available; the regular $99 starter kid will not be available. The $25 Starter Kit includes
- A box of annual catalogs
- A package of current seasonal catalog
- Getting Started DVD
- Starter Kit Business Brick
- Customer postcards
You'll also receive two FREE months of the Demonstrator Business Web Services (DBWS)!
Contact me today and we'll get you started!!
Thanks for looking!!
*´¨)
¸.•´¸.•*´¨) ¸.•*¨)
(¸.•´ (¸.•` ¤ Jamie*´¨)
Subscribe to:
Posts (Atom)


